Ice, Ice, Baby is the name given to a collection of hands-on activities to teach K-8 students about ice, glaciers and climate change in the polar regions. They were developed at the Center for Remote Sensing of Ice Sheets (CReSIS), where scientists are measuring the depths of ice sheets in Greenland and Antarctica to better understand their role in sea level rise.
Why does ice melt in the freezing climate of Antarctica? Elementary students always ask this question after learning that Antarctica’s average temperature is well below freezing. Students understand at an early age that ice and snow melt on the ground as the weather becomes warmer. Then, how do giant ice sheets melt if melting isn’t caused by warm temperatures? Doesn’t the sun melt them during the summer?
In the Antarctic, most ice stays frozen on the surface of the ice sheet due to the cold climate; however, liquid water forms under the ice sheet where pressures are high. This phenomenon, called regelation, occurs when ice melts under pressure and freezes again when the pressure is reduced. It is a unique property of water that is surprising to elementary students.
Two Ice, Ice, Baby lessons, reproduced below, demonstrate how glaciers move due to the pressure of the thick ice layers. “Blue Ice Cube Melt” shows how a glacier moves due to a change in the state of matter at the underside of the glacier. There is so much weight from the layers of heavy ice on top that the ice at the bottom can melt. Students learn how a solid can melt due to pressure, not just temperature. The student applies pressure to an ice cube, causing it to melt and slide easily.
The demonstration in “Can You Melt a Glacier with Pressure?” is a discrepant, or inconsistent, event for most students. It surprises them when an ice block doesn’t split in half when a wire cuts through it. Glaciers in the polar regions melt and refreeze at the bottom many times as they move toward the ocean. In fact, faster moving glaciers are often found where melted ice and snow, called meltwater, is present.
These two lessons are easily combined. The best way to do this is to fill in a Know-Wonder-Learn ice chart on the board; then present pictures of the polar regions with ice and glaciers. Next, set up the lesson “Can You Melt a Glacier with Pressure?” because it can take 20-30 minutes for the wire to completely cut through the ice block. While the wire is slicing the ice, students can participate in “Blue Ice Cube Melt.” Even ice cubes sliding off desks prove that glaciers slide more easily with water under them!
After we did the “Blue Ice Cube Melt” with children several times, their questions and conclusions caused us to make one change. Originally, we did not use the rubber fingertip pads. Students thought that heat from their fingers was melting the ice cubes and the ice was not melting as much from pressure. Once the rubber fingertip was used, it became clear to students that pressure was making a difference in the melting ice. Discussions about what role the heat from their fingers plays are important, however. What evidence is shown on their ice cube that their fingers did indeed melt a part of the ice cube? Be sure to talk about the indentation they have made on the top of the ice cube, as that impression is made from both the heat and the pressure of their finger!
From melting glaciers to melting icebergs, water is rapidly changing from a solid to a liquid at the poles. Learning why and how ice is melting and moving toward the ocean is a meaningful way to study the states of matter.
CAN YOU MELT A GLACIER WITH PRESSURE?
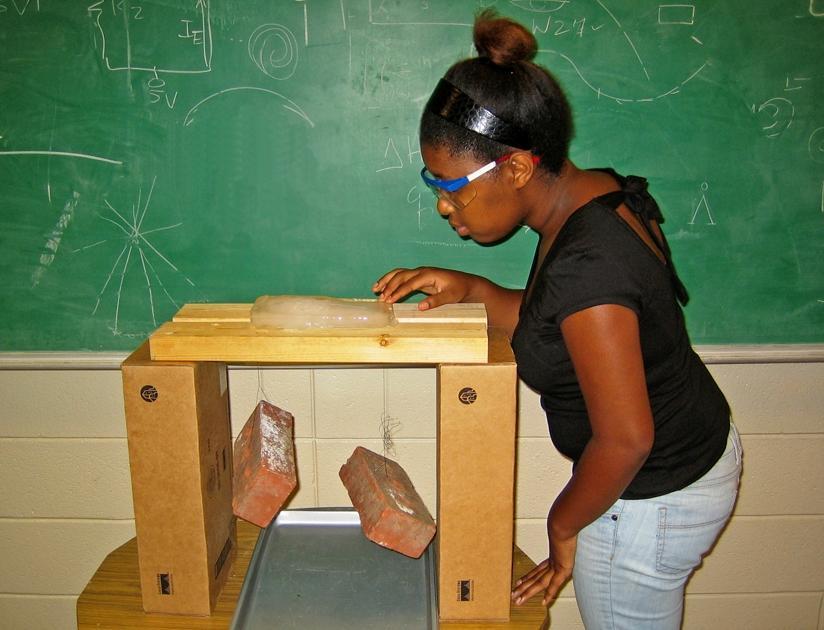
Image courtesy of Cheri Hamilton, CReSIS.
Background
This demonstration shows students one reason a glacier moves. A glacier is a large mass of ice that acts like a river, flowing downhill under the influence of gravity. As snow layers accumulate and gather weight, the pressure builds up on the bottom layer. This causes the bottom layer of ice to melt and it becomes soft and pliable. This warmer layer reduces the friction with the ground underneath and allows the glacier to move faster. The melting of the ice due to pressure and its refreezing is called regelation. The softer ice moves outward like thick honey. The snow layers continue to compress and add weight and pressure to the layers below, which causes continuing relegation, and therefore movement.
Materials
- A loaf pan of ice, 2 cm (2 inches) or more thick
- 2 bricks or weights
- Thin metal wire
- 2 boxes the same height, at least 50 cm (20 inches) above the floor
- 2 wood or metal boards, 30 cm (1 foot) long, to hold up the ice block between boxes
- 1 dishpan or cookie sheet to catch drips
Activity Time
30 minutes
Objectives
The student will discover that ice can melt due to pressure. The student will also be able to state one way a glacier is able to move.
Directions
1. Place the boxes about 30 cm (1 foot) apart and put the metal or wood boards on top of them like a bridge.
2. Leave an inch or so between the 2 pieces of the bridge.
3. Set the block of ice on the metal or wood boards.
4. Place a thin wire over the ice and between the two pieces of the bridge.
5. Tie a heavy weight to each end of the wire (the weights will be dangling on
either side of the ice block).
6. Place a drip pan under the ice.
7. Observe what happens to the wire and what happens to the ice. (This begins to happen
quickly, but takes 20-30 minutes before you are able to pick up the ice block without the wire.)
8. Ask students to touch the ice block where the wire has sliced through.
Discussion
- What happened to the wire? (The wire sank slowly through the ice.)
- What happened to the ice? (The ice under the weighted wire melted.)
- Why did the ice not break into 2 pieces? (The ice refreezes above the wire.)
- How does ice melt normally? (By a rise in temperature)
- How did ice melt at the wire? (By pressure)
- Where on the ice block does the ice become a liquid? (Where the wire cuts)
- If glaciers do not have a change in temperature, how do they melt at the bedrock? (From weight of the snow and ice above it. The weight applies pressure and produces heat to melt the ice.)
Assessment
Ask each student to write an exit ticket that states why glaciers melt when the temperature is below freezing.
Extension
Ask students to design another experiment using pressure to melt ice. Different wires and weights could change the results of this lesson.
NATIONAL SCIENCE EDUCATION STANDARDS: SCIENCE CONTENT STANDARDS
The entire National Science Education Standards document can be read online or downloaded for free from the National Academies Press web site. The content standards are found in Chapter 6.
Content Standards Grade K-4:
Standard B: Physical Science
- Properties and Changes of Properties of Matter
- Motions and Forces
Standard D: Earth and Science
- Properties of Earth Materials
Standard F: Science and Personal and Social Perspectives
- Changes in Environments
Content Standards Grade 5-8
Standard B: Physical Science
- Properties and Changes of Properties of Matter
- Motions and Forces
- Transfer of Energy
Standard E: Science and Technology
- Understandings about Science
Standard F: Science and Personal and Social Perspectives
- Populations, Resources and Environments
BLUE ICE CUBE MELT
Image courtesy of Cheri Hamilton, CReSIS.
Background
This experiment will demonstrate one way a glacier moves. Glaciers are slow-moving masses of ice that exist where more snow falls than melts. The layers and layers of snow that fall year after year are compressed to form ice. Glaciers act like rivers, flowing downhill under the influence of gravity. As they move, glaciers can widen and deepen valleys, and grind boulders into pebbles.
Glaciers cover about 10 percent of the earth’s land, mostly in Greenland and Antarctica. Here, glaciers can be as much as 2 miles thick and weigh millions of tons. This weight can cause the bottom layer of ice to melt and to become soft and pliable. This soft ice, called meltwater, reduces the friction between the bedrock and the ice, causing the glacier to move more easily.
Why do students use blue ice cubes? Blue ice occurs in the polar regions in old ice. The color comes from compressed ice where the air bubbles have all been squeezed out.
Materials
- Per team of 2:
- 2 (same size) ice cubes made with blue food coloring
- 1 sheet of wax paper
- 2 rubber fingertip pads (found at office supply stores)
- 1 pencil
Activity Time
20 minutes
Objectives
Students will discover that you can melt ice by using pressure without raising the temperature. They will understand that glaciers can move even in freezing temperatures due to the weight of the layers of ice.
Introduction
Begin by writing the Know-Wonder-Learn chart on the board. Ask students what they know about ice and write that under Know. Now ask them what they wonder about ice and write that below Wonder. As a class, complete this chart with what they have learned at the end of the investigation. Before giving directions, show pictures of glaciers to the class.
Directions
1. Place 2 ice cubes several inches apart on the wax paper.
2. Put the rubber fingertip on your index finger.
3. Leave one ice cube alone, making it the “control” in the experiment.
4. Predict what will happen to the ice cubes.
5. Push down with your index finger on one of the ice cubes for about 5 minutes, or take turns pushing down.
6. Observe what happens to both ice cubes.
7. Use a pencil to draw around the outside of each ice cube’s melt pool on the wax paper.
8. Move the ice around on the wax paper and see if it moves easily.
Discussion
- Which ice cube melted faster?
- What happened to the ice cube that you pushed on?
- Why is there more water around the one that you pushed on?
- Where did the dent in the cube come from? (Your finger)
- What is another way to do this experiment?
Assessment
Ask each student to write or draw an exit ticket that explains why glaciers melt when the temperature is below freezing.
Extension
Make this an inquiry-based lesson by asking students to try this same investigation and choose different surfaces (sandpaper, wood, concrete) when applying pressure. Students can also devise another method of pressure to melt ice cubes.
NATIONAL SCIENCE EDUCATION STANDARDS: SCIENCE CONTENT STANDARDS
The entire National Science Education Standards document can be read online or downloaded for free from the National Academies Press web site. The content standards are found in Chapter 6.
Content Standards Grade K-4
Standard B: Physical Science
- Properties and Changes of Properties of Matter
- Motions and Forces
Content Standards Grade 5-8
Standard A: Science as Inquiry
- Abilities Necessary to Do Science Inquiry
- Understandings about Science Inquiry
Standard B: Physical Science
- Properties and Changes of Properties of Matter
- Motions and Forces
- Transfer of Energy
Reference
National Research Council (NRC). 1996. National science education standards. Washington, DC: National Academy Press.
Ice Ice Baby Lesson Plans
18 ice-related lesson plans are available as downloadable pdf documents from CReSIS’s education page. Blue Ice Cube Melt and Can You Melt a Glacier, the two lessons described in this article, are included.
This article was written by by Cheri Hamilton. For more information, see the Contributors page. Email Kimberly Lightle, Principal Investigator, with any questions about the content of this site.
Copyright August 2009 – The Ohio State University. This material is based upon work supported by the National Science Foundation under Grant No. 0733024. Any opinions, findings, and conclusions or recommendations expressed in this material are those of the author(s) and do not necessarily reflect the views of the National Science Foundation. This work is licensed under an Attribution-ShareAlike 3.0 Unported Creative Commons license.